
Any time is the right time to put up a birdhouse and with the spring migration underway why not begin your build today? Building a birdhouse is a simple way to learn and develop basic carpentry skills while also including your child in the process. Today I have the plans and process for building a simple birdhouse that will attract a variety of bird types including bluebirds swallows, chickadees, nuthatches, warblers, woodpeckers, and wrens.
Advisory: The use of a power tool should be done with the assistance of an adult/parent or guardian and completed with necessary safety equipment. For this project i would recommend an adult/parent or guardian to cut the wooden boards to size and shapes prior to assembly.
Materials and Equipment Needed to Build this Simple Birdhouse
- Wood: 1″ x 6″ x 5′ (2.5cm x 15cm x 150cm)
- Screws: Approximately 1.5″ (4cm) long
- Power drill/ Impact driver
- Hand saw or Chop saw
- 1.5 inch Drill bit for the entrance hole
- A small drill bit for drilling pilot holes
- Safety glasses

Step 1. Cut the board using the birdhouse plans below.
Cut the 1×6 board as shown in the plans that I have included below. I prefer to sand all pieces so that my stain and/or finish go’s on evenly. I have chosen some cedar planks that we used for the construction of our barns floor but almost any scrap wood will do.


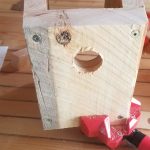
Step 2. Drill the entrance hole for the birdhouse.
Drill a hole for the entrance using 1.5 inch drill bit. This hole needs to be drilled 6 inches up from the bottom of the board. I have used a vise to hold my board for the drilling of the entrance hole.
Step 3: Assemble the birdhouse.
I would begin by drilling pilot holes to prevent the wood from splitting. I use a combination of glue and screws to attach the sides, floor, and back of the birdhouse together. Personally, I use a cabinet framing vise to ensure that each corner is connected at a 90 degree angle. I begin be connecting the front to the sides so that I can see if there is any warping in the wood that I might need to consider when connecting the roof, floor and back. I had some warping on one of the side boards that required a clamp in order for me to square up the sides for attaching the back panel.


Step 4. Paint or finish your birdhouse.
For my birdhouse I used shellack to finish the wood and protect it from mother nature. If using an oil based product for your finish I would highly recommend using a protective mask to prevent the inhalation of possibly dangerous fumes. A safer alternative is to paint your birdhouse with the family to give it a creative and fun aesthetic.

Step 5. Hang or mount your birdhouse.
Mount your birdhouse and see which bird will call your habitat home. This birdhouse should be hung at a height of 6-8 feet in order to promote the nesting of bluebirds swallows, chickadees, nuthatches, warblers, woodpeckers, and wrens.Then check in on your birdhouse over the next 8 weeks to see if anyone has moved in. You can make your birdhouse more inviting by placing sticks and wood chips in its interior, providing materials for birds to begin their nests.